Note: All pictures that follow are
"clickable". Clicking on them will show you an enlargement!
The "Mini-Flash",
is an R/C controlled, PC-programmable LED Sequencer/Flasher that is based around a small programmed
PIC microcontroller. The Mini-Flash controller includes 4 programmable LED
sequencing channels, although it allows
for a total of 8 LED connectors to be connected. Probably the
most unique, cutting-edge feature about the Mini-Flash is the ability to
customize the LED flashing sequence using a PC-based (i.e. Windows) program.
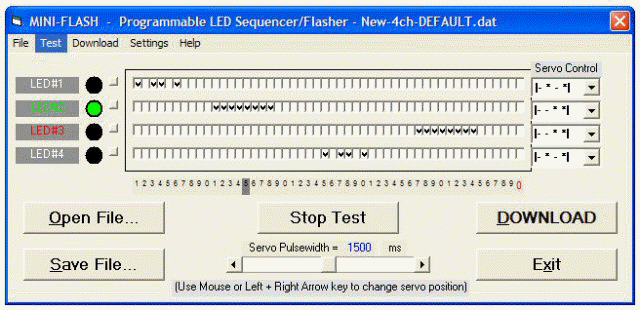 This
programming software includes a unique and intuitive Graphical User Interface.
Mini-Flash's servo wire which is normally plugged into a spare R/C receiver
channel for control, is also used to reprogram the Mini-Flash flasher/sequencer.
A computer's serial port (9-pin) connection and programming cable is only needed
to reprogram the Mini-Flash. (If
you do not have a serial port on your computer, most
USB-to-Serial Converters work too...
Click here to see a
verified list). The free downloadable programming software
also allows the user to "test" the LED sequence they develop by use of
software-based graphical representations of the 4 LED channels. The
sequencer speed can also be programmed by the user, as well as the sequencer end
marker (you don't need to use all 50 events in your sequence). Another
great feature of the Mini-Flash controller is that each of the 4 LED channels
can be controlled (on/off) using a spare R/C receiver channel. This gives
the user the ability to remotely turn on or off either of the 4 LED channels,
even while your model is being operated. How neat is that?
Mini-Flash Controller
Specifications
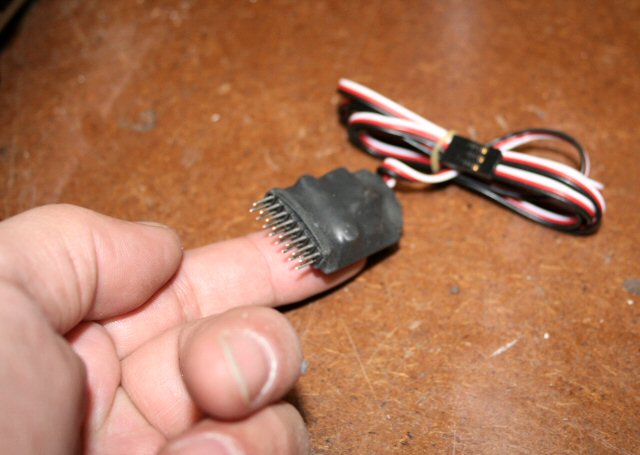 Weighing
merely 9 grams and roughly 1 square inch by 1/4" thick, the
Mini-Flash is based around a tiny 8-pin programmable microcontroller chip.
The controller can gets it power from either a R/C receiver or an external
battery (normally, it is plugged into a receiver). The Mini-Flash is
designed to operate off of a 4.8-5 volt power source therefore do not attempt to
run it off of anything else or you will ruin the microcontroller. The
Mini-Flash provides for 4 independent LED sequencer channels that are driven using
individual power output transistor (2N2222). These output transistors can
typically provide up to
600 milliamps of total current each, therefore, you are capable of connecting
multiple LED to each channel if required. In fact, theoretically speaking,
you should be able to connect at least 10-15 LEDs to each channel (assuming each LED
draws around 25 milliamps each). Each of the 4 Mini-Flash LED
channels can have up to a maximum of 50 individual events (an event either turns
the LED on or off).
| # of LED Channels |
4 LED Channels
(although Mini-Flash has two connectors
available for each of the 4 channels) |
| # Events/Channel |
50 maximum
(User can set for less if desired) |
| Operating Voltage |
4.8 volts to 5.0 volts
(a filtered/regulated source is
recommended, such as a BEC) |
| Operating Current |
With out LEDs connected,
roughly 15mA
(5mmLEDs draw roughly 20mA each) |
| Total Output Current |
Each Transistor handles
a maximum of 600mA
(so 600mA x 4 = 2.4 amps total) |
| Dimensions |
Roughly 1 square inch, not
counting the connector
(a little over 1/4" thick) |
| Weight |
Roughly 9 grams total
weight
(includes completed controller, servo
lead and LED connector) |
| Programming Software |
Tested on Windows 98, 2000, ME
and XP
(developed using MS Visual Basic 5.0) |
Contents (Assembled/Tested)
 The
picture to the left indicates exactly what is included in the Mini-Flash
(assembled/tested) kit :
(1 controller, one programming cable and eight 2-pin LED mating connectors). Remove
the contents from their plastic packing bags and be sure to not loose the small
miniature LED mating connectors. These connectors mate to the controller's
LED connections. To use these connectors, you will need to solder on some
small gauge, two conductor wire, a series resistor (see below)
and finally your LED.
NOTE:
Some pre-manufactured LEDs (for systems such as
Curtek) can easily plug right onto Mini-Flash's LED connections (header).
Note: If
you are using a BEC to power up your receiver, and you have the Mini-Flash
plugged into the receiver for power (and control), you will need to be
sure the BEC not only provide 5-6 volts, but also that it is rated for the total current that will be drawn, that being the
combination of the connected servos (normally powered from Rx), the receiver
itself, the Mini-Flash itself and the LEDs connected to the Mini-Flash.
Mini-Flash
Connections
The first step you will probably need to do is
to assemble your LED using the supplied mating connectors. Also be sure to
add an appropriate series resistor in series with one of the LED leads as you
need to limit the current supplied to the LED as to not exceed it's maximum
specified operating current, otherwise LED damage will occur. (See
Notes section below)
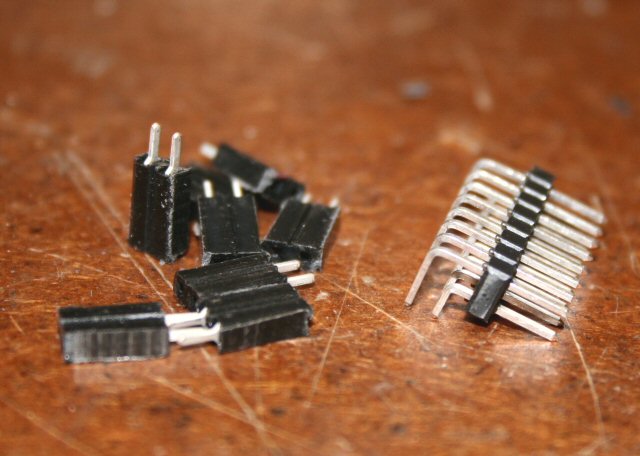 The
LED mating connectors supplied provide a nice tight connection to the LED
connector pins located on the Mini-Flash. If you are going to heat shrink
these ends, be sure you do not cover the black portion of the connector as this
will not allow you to plug these connectors side-by-side onto the Mini-Flash (as
the heat shrink makes the connectors too wide). If you are only
using 4 LEDs (one per channel), you can skip every other row on the Mini-Flash
header connector.
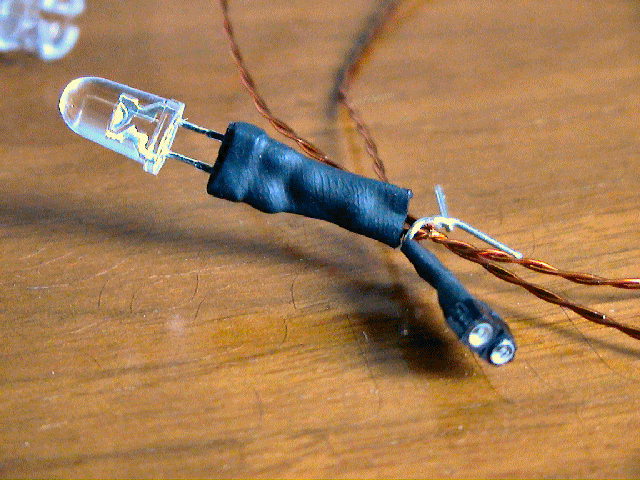 DIYRC
also sells machine pin connectors for simple plug-in of LEDs. Only
apply heat shrink around the metal portion of the connectors and connecting
wires, especially on the connector side that will connect to the Mini-Flash
controller. (see picture on left). These two-pin machine pin
connectors allows for the user to replace
LEDs (maybe to simply change a color). The LED connector include a 100 ohm
resistor (inside the black heat shrink tubing). Just a few ideas when you
are building your LEDs. You can also simply solder the LED wires directly to
your LEDs for simplicity.
 The
picture to the left indicates the LED channel outputs. Notice that each of
the 4 channels have two outputs, allowing you to connect two LEDs per channel.
If you want to add more LEDs to a channel, you will need to either make an
adapter (a "Y" adapter or splitter) or simply solder multiple LED lead wires
onto the connector. As shown in the picture, the pins along the top are
ground (-) while the pins along the bottom are positive (+).
The servo-like cable/plug leading out of the Mini-Flash serves two purposes.
One, it is used to download a sequence from your PC (via programming cable) to
your Mini-Flash and two, it is used to get servo information and power from your
receiver during normal use such as in your R/C model.
NOTE: Be sure that when you
connect the Mini-Flash cable to either your receiver or programming cable, you
pay close attention to voltage polarity. As with most servo wires, the
black or brown wire is ground, the orange or red wire is +V while the green or
white wire is the servo signal. Plugging the Mini-Flash's servo cable in wrong could and
probably would damage the Mini-Flash.
Programming the Mini-Flash
 Probably the neatest feature of the Mini-Flash is
the ability for the user to completely customize the flashing sequence for each
of the 4 LED channels, and then download it to the Mini-Flash. Not only
are these sequences programmable, but the user can also program the overall LED
sequencing speed. Another really neat and very useful feature is the
"Test" feature where you can actually visually test the sequence you programmed
even with out the Mini-Flash connected. Pressing the test button in the
software will run the sequence while visually displaying the actually sequence
on GUI-based LEDs. This test function also allows you to test servo
control function too by popping up a slider control which emulates the R/C
transmitter's stick/slider control. The following sections explain
each of the programming functions such as general Program Settings
(communications port and sequencer speeds), setting the graphical LED colors,
setting LED Channel Sequences, using the LED channel options button, setting the
end of the sequence, assigning servo control functions, testing the
sequence, opening, merging and saving sequence files on your PC and finally
downloading your sequence to the Mini-Flash.
Changing the General Program
Settings (Comm Port and Sequencer Speed settings):
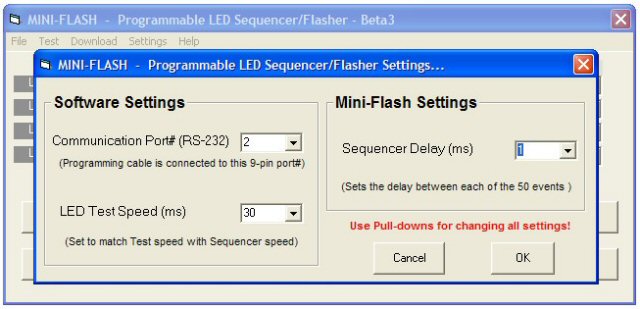 The
Mini-Flash programming software allows the user to alter the Mini-Flash
sequencer speed. Additionally, the software also allows the user to select
the proper communications port to which the download cable is connected to.
These settings can be changed by selecting the "Settings" menu option.
Selecting this option will bring up a new Settings window. On the far left
side, there exists a options frame that allows the user to change the
communications port (1->6). Use the pull-down and select the port # to
which you have the programming cable connected (it might in fact default to port
2 which you might not have; typically, this would be set to port#1). Once
you set this correctly, this setting is saved in a configuration file and will
never need to be changed again unless you plug the programming cable onto a
different port. On the far right of the Settings window, you will see two
modifiable settings mainly "LED Test Speed" and "Sequencer Delay". The
first, "LED Test Speed" allows the user to fine tune the sequencer's speed
when using the "Test" button. Although the software uses timers, I have found
that some older computer can run sluggish. This setting usually defaults
to 20 (20 milliseconds) and should suffice on most modern computer. You
can change this setting (up or down) to alter the test speed, such that it
closely matched that of the real Mini-Flash sequencer. The "Sequencer
Delay" option allows the user to alter the actual running speed on the
Mini-Flash unit (this value is also sent to the Mini-Flash" when downloading a
sequence). This "delay" value indicated the actual delay between each of
the 50 programmed events. A delay value of 1 (1ms) will make the
Mini-Flash run as fast as it can. Increasing this delay value will slow
down the running of the sequence (increases the delay time between events).
Experiment with these values until you are happy with the results.
Typically, a delay setting of 10-15ms will suffice for most applications.
The
Mini-Flash programming software allows the user to alter the Mini-Flash
sequencer speed. Additionally, the software also allows the user to select
the proper communications port to which the download cable is connected to.
These settings can be changed by selecting the "Settings" menu option.
Selecting this option will bring up a new Settings window. On the far left
side, there exists a options frame that allows the user to change the
communications port (1->6). Use the pull-down and select the port # to
which you have the programming cable connected (it might in fact default to port
2 which you might not have; typically, this would be set to port#1). Once
you set this correctly, this setting is saved in a configuration file and will
never need to be changed again unless you plug the programming cable onto a
different port. On the far right of the Settings window, you will see two
modifiable settings mainly "LED Test Speed" and "Sequencer Delay". The
first, "LED Test Speed" allows the user to fine tune the sequencer's speed
when using the "Test" button. Although the software uses timers, I have found
that some older computer can run sluggish. This setting usually defaults
to 20 (20 milliseconds) and should suffice on most modern computer. You
can change this setting (up or down) to alter the test speed, such that it
closely matched that of the real Mini-Flash sequencer. The "Sequencer
Delay" option allows the user to alter the actual running speed on the
Mini-Flash unit (this value is also sent to the Mini-Flash" when downloading a
sequence). This "delay" value indicated the actual delay between each of
the 50 programmed events. A delay value of 1 (1ms) will make the
Mini-Flash run as fast as it can. Increasing this delay value will slow
down the running of the sequence (increases the delay time between events).
Experiment with these values until you are happy with the results.
Typically, a delay setting of 10-15ms will suffice for most applications.
NOTE: Please use all
pull-downs for changing these setting values!
Setting GUI LED Colors:
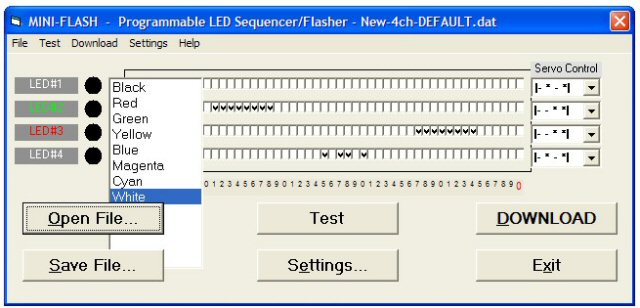 The
Mini-Flash programming software emulates the LEDs connected to the Mini-flash
controller and these LEDs (LED#1 - 4) are shown towards the left of each of the
4 sequence event rows. Initially, when the software is loaded, these color
default to White. To select an LED color,
click on the LED name (LED#1-4) with your mouse and a window will pop up with
various color names. Simply select the appropriate color (maybe even the
color LED you plan to actually hook up to your Mini-Flash). Upon selecting
the color, the LED text color will also change indicating the color the
graphical LED will appear when triggered. Do this for the remaining
graphical LEDs.
NOTE: If you programmed a sequence, pressed the "Test" button and do not
see any graphical LEDs flashing, you might have forgotten to set the graphical
LED colors (if Black.. they will not flash). Stop the test, set the colors and rerun the test.
Setting LED Channel Sequence/Events:
The user has 50 events per channel that are capable of being programmed where an
event is either On or Off, as indicated with a check mark if On. You can set the
sequence for each channels by using your mouse and mouse button (you can even
hold and drag across the row to mark/unmark). Click on the
individual checkboxes to either set or unset the individual sequence event.
Another quicker method to set a particular channel's sequence is to use the
Channel Options button (small square button just to the right of the graphical
LEDs) which is explained below.
Using the LED Channel Options button:
 The
Channel Options button allows you to manipulate the selected channel's sequence
in that you can quickly:
| Clear All |
Turns OFF all events on
selected channel |
| Set All |
Turns ON all events on
selected channel |
| Toggle All |
Toggles the state of all
selected channels events (if event is on, it is turned off, if event is
off, it is turned on) |
| Copy To |
Copy the selected channel (all
events) to another channel (user then selects channel to copy to)
|
| Copy From |
Copy another channel's events
into the selected channel (user then selects channel to copy from)
|
| Skip 1 |
Turns on every other event on
selected channel |
| Skip 2 |
Turns on every 3rd event on
selected channel |
| Skip 3 |
Turns on every 4th event on
selected channel |
| Cancel |
Cancels the Channel Options
action, returns to GUI |
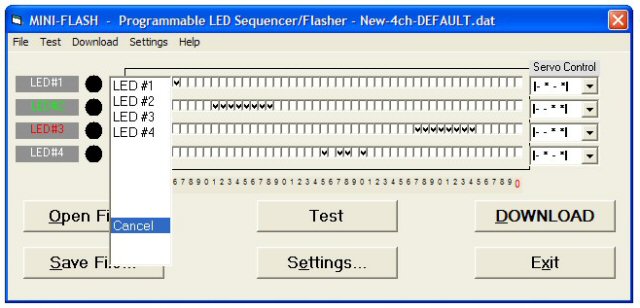 If
you selected either the "Copy To" or the "Copy From" option, you will see this
pop-up window shown to the left, allowing you to choose a LED channel (LED#) for
which to either copy to or to copy from. Upon selecting one, you will see
the selected channel's sequence events update accordingly.
Setting the LED Sequence "End Marker":
Normally, the Mini-Flash programming assumes that the user will use all 50
events when developing a new sequence. There might be a time when the user
might only want to use 25 events instead of 50. If you were to look
closely at the programming software, there exist a grayish line across the
bottom of the sequencer that has numbers (1->10 or really 1->0) that cycle 5
times, indicating the 50 individual events. This "event bar" is also used
to indicate the displayed events as they are being played pack during testing.
The programming software indicates the sequence "end mark" by painting a number
on this bar RED. Normally, when starting a new sequence, you will see the
far most "0" painted red (event #50). This indicates that this event will
be the last event in the sequence and will then loop back around to the first
event (Event #1), repeating indefinitely. To change this setting, simply
"double-click" on another number located on this bar until you see it change to
red/bold text. The sequence end mark has now been changed. If you
were to now press "Test", you will see that the test sequencer now cycles up to
the newly selected end marker and then loops back to the first event. This
End Marker setting is also sent to the Mini-Flash when ever a sequence is
downloaded.
The All-Important "Servo Control":
 The
Mini-Flash programming software includes a "servo control" for each of the 4
channels that allows the user to use a R/C servo output (from a R/C receiver) as
a "switch" control for each LED channel. This feature allows the user to
control (turn On or Off) each of the 4 channels in response to the position of
the servo control. If the user uses a stick/slider as the servo control,
the user will be able to define one of 16 control settings for each LED channel.
These settings are based upon the servo position, that consisting of 4 unique
"Zones". The zones are 0->1/4, 1/4->1/2, 1/2->3/4, and 3/4 ->Full (with
full being the full deflection of the switch/slider). But how do you get
to choose 1 of 16 positions? Well, you are also allowed to select one of
the 16 possible "binary" combinations of these zones. For instance, you
could program a LED channel to be active only when the stick is in the first
zone (0->1/4) OR in the forth zone (3/4->Full). This binary interpretation
would be "1001".
The
Mini-Flash programming software includes a "servo control" for each of the 4
channels that allows the user to use a R/C servo output (from a R/C receiver) as
a "switch" control for each LED channel. This feature allows the user to
control (turn On or Off) each of the 4 channels in response to the position of
the servo control. If the user uses a stick/slider as the servo control,
the user will be able to define one of 16 control settings for each LED channel.
These settings are based upon the servo position, that consisting of 4 unique
"Zones". The zones are 0->1/4, 1/4->1/2, 1/2->3/4, and 3/4 ->Full (with
full being the full deflection of the switch/slider). But how do you get
to choose 1 of 16 positions? Well, you are also allowed to select one of
the 16 possible "binary" combinations of these zones. For instance, you
could program a LED channel to be active only when the stick is in the first
zone (0->1/4) OR in the forth zone (3/4->Full). This binary interpretation
would be "1001".
NOTE: The first, far-left "1" in this example is
Zone#4 that indicates the 3/4-Full stick/slider position, while the second,
far-right "1" indicates Zone#1 or the 0-1/4 stick/slider position.
All 16 combinations are available to the user. The
servo pulse position determines the binary "mask" applied to each LED's sequence
set by the user. A mask of "*-*-" (as selected in the programming
software) would mean the sequence would only be active (turned on) when the
servo is in Zone#4 (3/4->Full) or in Zone#2 (1/4-1/2). As another last
example, a mask of "***-" would mean the LED sequence would be active for zones
2 thru 4, except for zone 1 (0->1/4), where the channel would be turned off.
If the servo output used for the control is a toggle switch instead of a
variable slider/joystick, you would then obviously have only two zones (on or
off, or, 0->1/4 and 3/4->Full). The chart below indicated how the servo
control setting works for each of the LED channels.
|
Servo Control Setting |
Position of Transmitter Stick/Slider
and its Effect on an LED
Channel |
Zone #4
(3/4 -> Full) |
Zone #3
(1/2 -> 3/4) |
Zone # 2
(1/4 -> 1/2) |
Zone #1
(0 -> 1/4) |
----
(Off)
(i.e. Always On) |
OFF |
OFF |
OFF |
OFF |
|
---* |
OFF |
OFF |
OFF |
ON |
|
--*- |
OFF |
OFF |
ON |
OFF |
|
--** |
OFF |
OFF |
ON |
ON |
|
-*-- |
OFF |
ON |
OFF |
OFF |
|
-*-* |
OFF |
ON |
OFF |
ON |
|
-**- |
OFF |
ON |
ON |
OFF |
|
-*** |
OFF |
ON |
ON |
ON |
|
*--- |
ON |
OFF |
OFF |
OFF |
|
*--* |
ON |
OFF |
OFF |
ON |
|
*-*- |
ON |
OFF |
ON |
OFF |
|
*-** |
ON |
OFF |
ON |
ON |
|
**-- |
ON |
ON |
OFF |
OFF |
|
**-* |
ON |
ON |
OFF |
ON |
|
***- |
ON |
ON |
ON |
OFF |
**** (None)
(i.e. Always On) |
ON |
ON |
ON |
ON |
Included with the Mini-Flash software download are a
few example files that show you some sample sequences/controls you can develop.
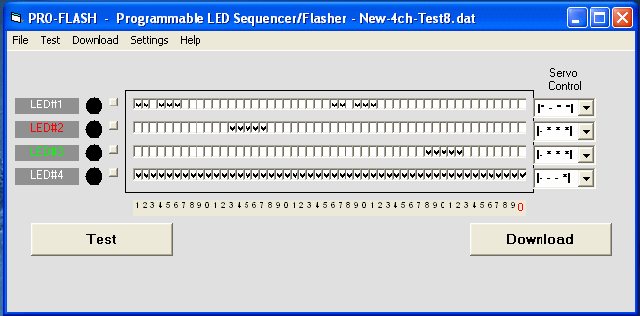
Use your own imagination... the possibilities are almost endless. As for
one example (see New-4ch-Test8.dat), this is how each of the channels are set up
Ch#1 = White LED, 1 double blink (on-off-on-off)
every second (Tail Strobe)
Ch#2 = Red LED, one longer blink (on-off) every 2 seconds; alternates with Ch#3
(Wingtip)
Ch#3 = Green LED, one longer blink every 2 seconds; alternates with Ch#2
(Wingtip)
Ch#4 = White LED, always ON (Landing light) - but controlled by servo control
(see below)
This can be seen on the following screen shot:
As for servo controls, the following can also be
programmed (assuming you are controlling Mini-Flash using a spare slider/stick
channel, or even tapping off of the throttle servo wire):
When stick is 3/4 - to- Full deflection, Only CH#1 is active
(i.e. flashing strobe on Tail)
When stick is 1/2 - to- 3/4 deflection, Only Ch#2 and Ch#3 are active (i.e. red
& green wing
tip light)
When stick is 1/1 - to- 1/2 deflection, Only Ch#1, Ch#2 and Ch#3 are active
(i.e. Both strobe and wingtip lights)
When stick is 0 - to- 1/4 deflection, All channels (1-4) are active (i.e.
Strobe, wing tip & Landing light)
The Servo Controls for each channel are set as
follows:
Ch#1 = "*-**" (ON only when servo signal is in
zones 1, 2 and 4)
Ch#2 = "-***" (ON only when servo signal is in zones 1, 2 and 3)
Ch#3 = "-***" (ON only when servo signal is in zones 1, 2 and 3)
Ch#4 = "---*" (ON only when servo signal is in zone 1)
The 4 servo "zones" are as described
(Zone#4, Zone#3, Zone#2, Zone#1):
Zone #1 = Stick in 0 to 1/4 deflection
Zone #2 = Stick in 1/4 to 1/2 deflection
Zone #3 = Stick in 1/2 to 3/4 deflection
Zone #4 = Stick in 3/4 to full deflection
The more you experiment, the more versatile you will find the Mini-Flash
programmer!
NOTE: If the servo
controls appears backwards, simply reverse the channel on your programmable
transmitter.
Testing the programmed LED Sequence:
 The
programming software allows the user to "test" the current programmed sequence,
including the servo control functions programmed by the user. To initiate
the test, press the "Test" button in the programming software. Upon
pressing this button, you will see the test sequencer display the programmed
sequence on the graphical LEDs in the program. If you have selected a
servo control for either of the 4 channels, you will also see a scroll bar along
the bottom of the page. This bar is used as if it was the transmitter's
stick/switch, allowing you to test the servo control functions you have
programmed for each LED channel. You can use the left/right arrow keys to
alter the scrollbar setting or you can use your mouse to move the slider.
As you change this slider, you will notice the servo pulse width value changing,
just as if it was a servo signal coming from the receiver. As you change
this slider, you should see its effect on the programmed LED channels. If
no servo controls are programmed for any of the channels, this scrollbar type
control will not be displayed, since it is not needed.
New/Clear, Open, Merge, or Save Sequence File:
 The
programming software allows the user to either develop a New LED
sequence (clearing all current sequence events), Open an existing
sequence file (previously saved sequence files like the sample files included),
Merge an existing sequence file into the currently displayed
sequence or Save the current sequence. These options are
easily selected under the "File" menu in the programming software and are fairly
intuitive (these are general dialog boxes most MS Window users are already
familiar with).
Programming the Mini-Flash !
After you are satisfied with your programmed LED sequence, you can easily
download it to your Mini-Flash, and this normally takes less than 10 seconds.
It is very important though that you follow the instructions below very
carefully. Please read carefully before attempting to download the
sequence.
STEP-BY-STEP PROGRAMMING INSTRUCTIONS
Step 1: Unplug the Mini-flash from its power
source, that being a battery or a receiver that is powered up. Also, be sure you have some LEDs connected to the controller.
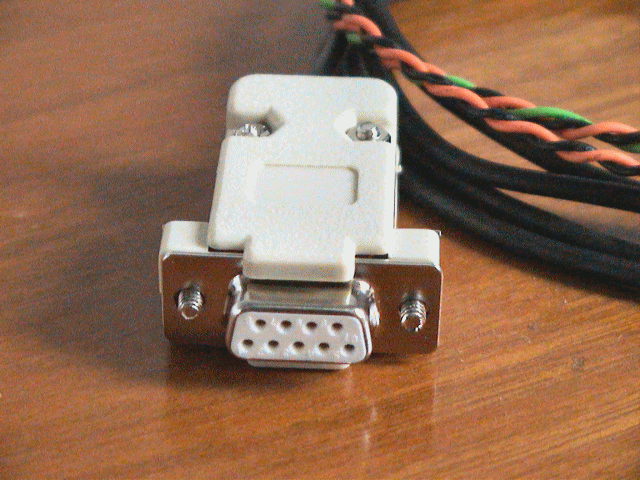 Step 2: Connect the programming cable's 9-pin connector (rs-232 serial
cable) to an empty RS-232 serial communications port on your computer. Make note of the
actual com port number (usually 1 or 2, some PCs could have more), as you will
need to define this port in the programming software later if you already
haven't changed it.
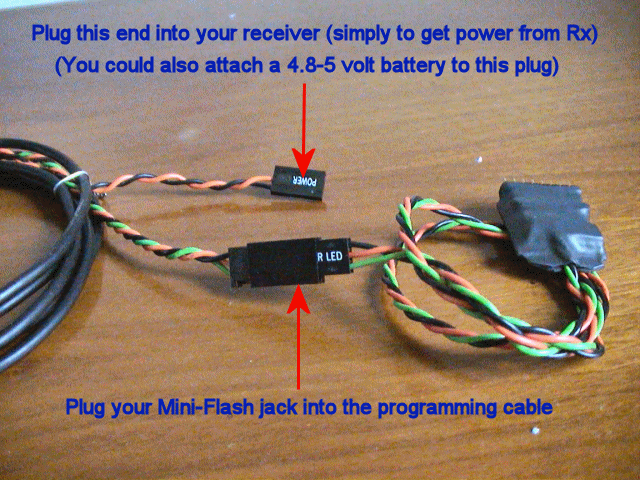 Step 3: Connect the POWER end of the programming cable (female plug) to
your receiver and be sure the receiver is powered up (this connection to the
Receiver simply provides power to the Mini-Flash during the downloading process;
you could always use a 4.8v-5v battery instead of connecting it to your receiver)
NOTE: Always observe polarity when plugging the Mini-Flash
into the receiver!
NOTE: DO NOT connect the Mini-Flash to the programming
cable quite yet (step 6)
 Step 4: Now, run the software and configure the LED channels as you like them.
You could also load a supplied example file for test purposes. If you
haven't done so already, you could "virtually" test the sequence by hitting the
"Test" button in the software
(hit "Stop Test" button to stop testing)
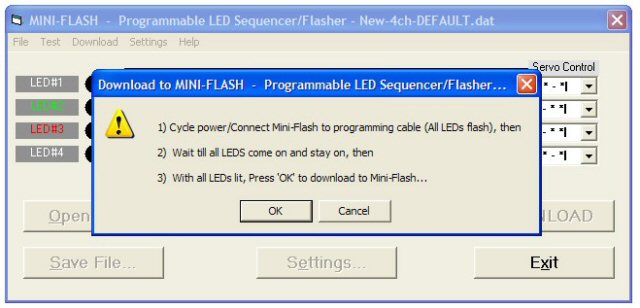 Step
5: When happy with the sequence and controls, hit the "Download"
button and a message (shown on left) will pop up. This message tells you to cycle power to
the Mini-Flash or connect the Mini-Flash to the programming cable.
STOP! The next step (#6) is very important so
please read thoroughly!
Step 6: With this message still displayed, connect the Mini-Flash's servo
connector to the male mating connector on the programming cable. As
soon as you do this, you will see the all the LEDs on the Mini-Flash flash
briefly, then go off.
They should stay off for around 8 seconds or so... this is a time out for
allowing for PCM receiver and ESC fail-safe anomalies. After this 8
seconds period, all LEDS on the Mini-Flash should light up for around 3 seconds.
This 3 second period is
when you need to then press the OK button to finally complete the download.
If the LEDS go out (and start flashing) before you had time to hit the OK
button, disconnect the Mini-Flash from the programming cable and repeat starting
at the top of Step 5. IT IS REALLY IMPORTANT TO
HIT THE "OK" BUTTON WHILE ALL LEDS ARE LIT (3 seconds). This is the only time
the Mini-Flash can be programmed by the PC.
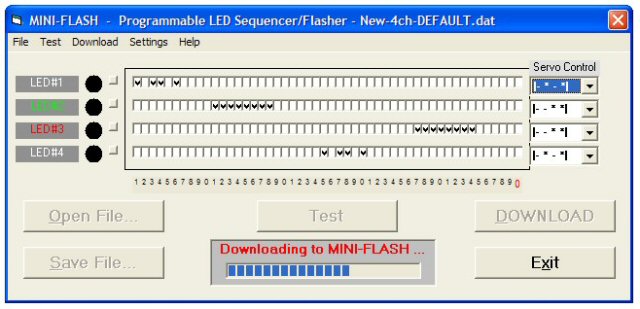 Step 7: You will notice that immediately after
you hit the "OK" button, Mini-Flash's LEDs all go out (all LED extinguish). At
the same time, you will see the downloading progress as indicated by the
software's download progress bar along the bottom of the screen. This
download process typically takes on the order of 8-10 seconds. When the
download is completed, you will see the download bar disappear and then see the LEDs
on the Mini-Flash begin flashing your programmed sequence (if not, repeat from
Step 5). You will not be able to test
any of the servo control functions until you connect the Mini-Flash directly to
your R/C receiver.
Step 8:
Disconnect the Mini-Flash from the programming cable and disconnect the
programming cable from your R/C receiver. Now, with your transmitter and
receiver turned on (both powered), plug the Mini-Flash's servo connector
directly to the R/C receiver channel which you want to use as a control.
As soon as you plug it in, your Mini-Flash should flash all LEDs briefly, pause
7-8 seconds, then it should be fully operational (LEDs
flashing and servo controls functioning). You are now
done! Simply repeat this process if you want to reprogram the Mini-Flash
again with a different sequence.
NOTE: In
order for the Mini-Flash to use these programmed setting and be fully
operational each and every time you power it up, you will need to be sure that
your R/C transmitter is powered ON before the Mini-Flash completes its startup
procedure (flash all LEDs, pause 7 seconds, then normal operation begins).
This is normal recommended operations for most R/C models (as it is safer on
your model's servos and control surfaces). If the transmitter is not
turned on before the Mini-Flash is
ready (no servo signal), it will go into a "free-running" mode where all sequences are active,
regardless of the servo signal. Even if you then turn on your transmitter,
it will stay in this free-running mode until power is cycled to the Mini-Flash.
WARNING!: DO NOT turn on your transmitter
when the Mini-Flash has all its LED lit (3 seconds period used to program
the Mini-Flash). Doing this program the Miniflash with servo data from
your receiver. This obviously will damage the previously programmed sequence and
you will be required to reprogram the Mini-Flash. So, for normal operation
again and again, the following powering sequence you
should be adhered to.
Operating the Mini-Flash
The following instructions describe how the user
would normally operate the Mini-Flash once installed in your model. Be
sure to thoroughly read these instruction before proceeding.
STEP-BY-STEP OPERATING INSTRUCTIONS
1. With all devices off (no power to transmitter,
receiver or Mini-Flash), power up your transmitter and be sure it is outputting
RF (some Tx take a second or two).
2. With your receiver off, connect the
Mini-Flash to its appropriate channel (normally, it is already connected in your
model)
3. With your R/C Transmitter on, and the Mini-Flash
plugged into your receiver, finally power on the receiver.
4. You should see the all the Mini-Flash LEDs flash,
pause for 7 seconds, then normal operation should begin. Only then will
the Mini-Flash be fully operational; LEDs flashing along with servo control
functionality.
5. Power off sequence is not that important but
normally (and for safety sakes), it's always good to power off your receiver
before powering off your transmitter.
Other Notes
DON'T FORGET THE ALL IMPORTANT
SERIES RESISTOR INLINE WITH ALL LEDS !!!
WHY THIS SERIES RESISTOR?
READ BY CLICKING HERE!
The LEDs you will connect to the
MINI-FLASH need to have a resistor in series with one of the LED's leads
in order to limit the current going into the LEDs (I usually use the + anode lead
but you can use either the anode or cathode lead). The
resistor value depends on the LED's forward voltage and the LED's maximum
current rating. These specs are usually supplied by the LED manufacturer.
The basic formula for calculating this required series LED resistance is as
follows:
Required Resistance = (Voltage
Source - LED Forward Voltage) / Max LED Current
or
R = (Vs-Vf) / Imax
As an example, a particular LED has a 3.0 volt
forward voltage (Vf) and a maximum current rating of 20mA. It is to be
driven with a 5.0 volt source. Therefore,
R = (5.0 - 3.0) / .020
or R = 2.0 / .020
or
R = 100 Ohms
If you do not know
the LED specs, typically, a 80-100 ohm resistor will do just fine.
LINKS TO ON-LINE
FORMULAS/CALCULATORS!
http://linear1.org/ckts/led.php (simple LED resistor calculator)
http://led.linear1.org/led.wiz (another LED calculator for multiple LED in
series or parallel)
http://www.besthongkong.com/clrc.htm (a neat calculator hosted by a big LED
distributor in Hong Kong)
Some Interesting Visual Basic coding
information (Picaxe to/from PC serial port)
http://www.rentron.com/VisualBasic.htm (Reynolds Electronics)

 DOWNLOAD
THE
MINI-FLASH
PROGRAMMING
SOFTWARE !
* Click Here *
MINI-FLASH FAQ
Q1. How do you compensate for
differing forward voltages and current drawn by differing LED's?
A1. Ah.... good question....
The input voltage to LEDs is all not that important (usually 5v is fine for
all). It is the current that you push through the LED that is important, as you
do not want to drive them with too much current. You usually always need to put
a series resistor inline with one of the LED leads such to limit the current. I
use a neat calculator, I even have a link for it on my webpages. You really need
to know the specs on the LEDs, particularly the LEDs rated current (typical 5mm
LEDs run around 20-25 milliamps). Here's the calculator:
http://linear1.org/ckts/led.php
You simply enter the supply voltage (in the
controller's case, 5 volts), the LEDs forward voltage (this varies from LED to
LED) then enter the rated LED current (typically 20-25 milliamps). Then hit the
"find R" button and the program calculates the resistor value you need for that
LED (typically a 68 - 120 ohm resistor is required). Be careful also as there
exists some LED that already have the series resistor incorporated in the LED
(not all that common though). Once the resistor value is determined, I
usually then solder it to the end of one of the LED leads. The wires then
leading from this LED assembly is then connected directly to the controller
using a miniature machine-pin female socket (I will provide at least 8 with
every controller). Putting the series resistors on the PCB would take up
space (unless they were SMD maybe).
Q2. I have a question: So tell me
how you could control different sequences with a TX like a 6102 which is a 6
channel but the 2 extras are more like landing gear, and flaps?
A2. Great question.... ( I knew I'd eventually have
write about this, as most will probably use a switch and some will have the
luxury of having a spare variable channel, like a rotating knob or lever).
Is the landing gear channel on your system controlled by a switch ? (most
likely). How about the flaps, are these a switch too or is this a rotating knob
(like I think my Futaba 9C has) ??
If the channel you have the flasher plugged into is controlled (Tx) using a
toggle switch, you will still be able to control the 4 LED channels/sequences,
but you will only have two possible servo control positions, on (*---) and off
(---*). If you were to look at the "Servo Control" pull-down in the
software, you have 16 different "servo zone" combinations you can chose. All 16
work only when you are using a variable Rx channel, such as a channel being
controlled by a knob, slider or stick. If you are only using a "switched" Rx
channel and you want to simply use the switch to turn the channel on or off, you
would set up the "servo control" such that it is "*---". What this would do is
make the selected LED channel active only when the switch is in the up position
(actually, it is as if the stick is in the position, 3/4->Full
deflection). Now catch this, if you were to choose the "**--" option or the
"***-" option, this would still have the same effect. When using a toggle
switch on your Tx to control the LED flasher, the receiver will never
output the middle two zones (-**-). Therefore selecting these zones in a
channel's servo zone will do nothing.
Q3. I do not have a RS-232 port
on my laptop/computer!
What can I do now?
A3. No Problem! You can use an USB-to-Serial
converter that plugs into a spare USB port on your computer. On the other
end of the cable is a female RS-232 connector you plug the Mini-Flash
programming cable into.
CLICK HERE TO VIEW A
LIST THAT IS KNOWN TO WORK !

Earthmen
Productions
© Dec-00-Mar-12


Home | MiniFlash-1 Manual | MiniFlash-2 Manual | MiniFlash Assembly | DOWNLOAD SOFTWARE
